With Covid-19, we’ve seen an exponential increase of live streaming, even in areas where we wouldn’t have expected it. I found myself having to broadcasting events from a place where there wasn’t any wired Internet connection nor Wi-Fi, and without any professional and dedicated equipment. Day after day, I come up with a solution that has great performance with very low costs.
Material
First of all, let’s summarize the equipment:
- Computer: personally, I’m using a MacBook Pro and this guide is written for this platform. Probably there won’t be much difference if you are using Windows or other OS;
- OBS: this is a free, open-source and very common software for live streaming;
- One or multiple cameras (a smartphone is great): I’m using an iPhone and an iPad, they already have great cameras so you don’t need to buy expensive professional ones. We will connect them later to OBS;
- An external sound card (optional);
- At least one server. I am using two VPS that they cost about $4 a month each, with simply 1 vCPU, 2 GB of RAM and 10 GB of storage. I can suggest you OVH, Aruba or DigitalOcean, depending on your location: the closer you are to the server, the better the connection (generally);
- Being a geek 👨🏻💻😂: I suggest you to stop here if you are not ready: reading the whole article can cause you nightmares.
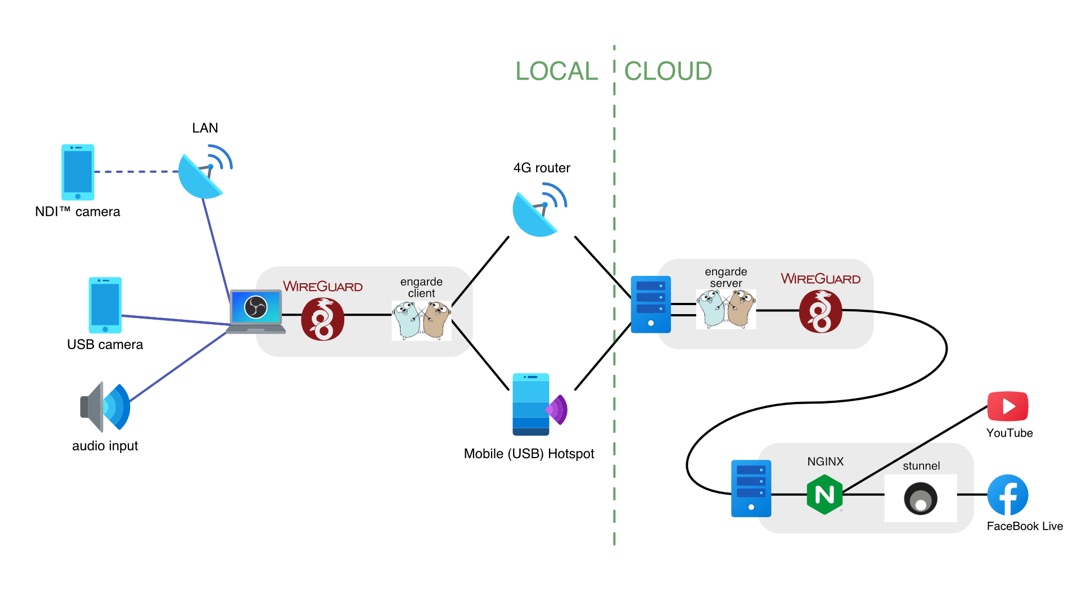
The whole setup in this article, looks like this at the end:
1. Setup OBS and cameras
If you have never used OBS, I suggest you to play around with the program and look at some of the billions of tutorial about this program that you can found in the magic world of Internet. I’ll not cover the basics of this software. Let me only link this YouTube video that covers many aspects of multi-camera streaming with OBS (the first part about camera interfaces is useless if you use smartphones as me).
To use an iPhone or an iPad as camera and connect them to OBS there is a great app from Will Townsend called OBS Camera. It’s a on-time purchase of about $16 and can save you hundreds of bucks. With this app you can stream to your computer either via USB and via WiFi. I suggest you to have at least one device connected through USB, to avoid the lack of input streams in case of problems with WiFi.
USB connection - OBS Camera
To connect your Apple device through USB, follow the official guide from OBS Camera.
I suggest you set “Bitrate” value to 10000kbps. With this value “in the middle” you will not overload both USB connection and device CPU work required to compress the video frames.
WiFi connection
OBS Camera let you stream video to your computer through NewTek’s NDI™ technology. There is a guide from OBS Camera to setup the connection with OBS Studio. You need to make sure you’re using a 5GHz WiFi connection to stream smoothly.
To receive the WiFi stream on computer, I am using a simple router (with no Internet) that is Ethernet-connected to my PC. The iPhone or iPad needs to be connected to router’s WiFi and have Mobile Data disabled.
Audio
It’s important to take care of the audio. There are to main solutions to get it into the stream:
- If you have the chance, connect to the output of an audio system or an external sound card, the quality will be much better.
- Alternatively, you can use input from the microphones of my USB-connected iPad in all the scenes, placing the iPad video stream behind the selected camera’s video and muting this camera audio.
2. Setup Internet connection
This step sounds trivial, but I can assure you it requires some work.
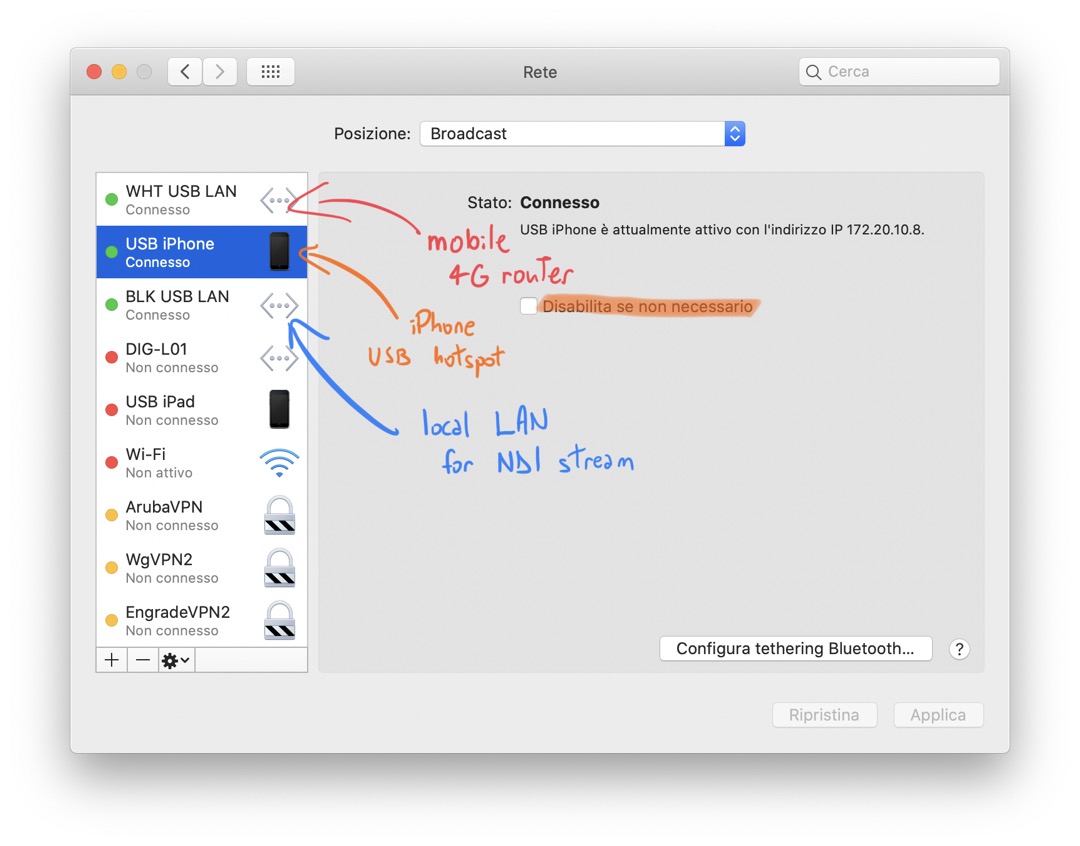
I am streaming with the mobile data from my iPad, that is connected to my computer trough USB. It is now important to setup the correct order of services to make things working: the Internet connection must have the priority on the network you are using for NDI if this is not Internet-connected.
Here are my settings:
In case you are using Android USB tethering on macOS, look at this solution.
3. Setup server for streaming to multiple destinations
I have published a dedicated step-by-step guide to setup a simple server for streaming on multiple platforms without paying $20/month on Geek Tips.
(Optional) Setup multiple connections for better reliability
If you are using mobile data to stream, you will probably have some downtimes, some instants when the mobile connection is not responding. You don’t want your audience to miss some parts of the live stream.
If you have multiple connections, you can prevent this, as long as at least one of the connections is working.
Usually OS only use one channel, although they have multiple connection, so you’ll have to setup a mechanism to use all available connection. In this case connection bonding is not the right solution because our goal is not to increase available bandwidth, but to have redundancy.
There is an open source solution developed by an italian guy specifically for streaming and broadcasting, called engarde. It is build on top of WireGuard and I can assure you it will drastically reduce connections problems. I have published a practical guide on how to setup engarde for this propose on Geek Tips.
Remember to check the order of connections services in your settings and to exclude your local network you are using for NDI broadcast.
4. Test
You need to test if all works on every step. Test, test and test.
Go Live
Now you are ready to go live from everywhere with an equipment that can fit in your backpack and having quite professional results!
Comments